Note: this tutorial applies to Vaadin Spring 2.0
During this tutorial we will be solving a number of common problems when using the Vaadin Spring plugin. The principal question we will be addressing is "How do I gain access to Spring features in a Vaadin project?"
Introduction
At the end of this tutorial you will have learned how to
-
Set up a Vaadin Spring project using Spring Boot
-
Create UI’s and Views with Vaadin Spring
-
Use injection with standard and Vaadin Spring scopes
-
Set up a Vaadin Spring project without Spring Boot
We will assume familiarity with Vaadin 7 and common Spring concepts. As a reference development environment we’ll be using Eclipse Neon with the Vaadin plugin, Maven and Tomcat (embedded when using Spring Boot). Installation and configuration of said environment is outside the scope of these tutorials.
The tutorials will build off one another, each starting where the previous left off. Various steps of the tutorial and alternative approaches will in the future be available as tags/branches at https://github.com/vaadin/spring-tutorial. More code samples could be found at https://github.com/vaadin/spring-demo7 as well.
Vaadin Spring for the impatient
If you are eager to get started right away without following the tutorial, feel free to do so. There are still some practical details that are good to keep in mind if you’re not familiar with Vaadin Spring or Spring in general.
-
Objects must be injected and managed by Spring in order to use Spring features.
-
Use
SpringVaadinServletandVaadinConfiguration. When using Spring Boot, these are automatically set up and you don’t need to explicitly set up a servlet. Otherwise, add@EnableVaadinon a@Configurationclass and useSpringVaadinServlet. -
Annotate your UI class with
@SpringUIto let Vaadin Spring know that it should inject and use instances of that class when the application is opened in the browser.
Getting Started with Vaadin Spring and Spring Boot
The fastest way to build and run a Spring application is to use Spring Boot. To build a Spring application without Spring Boot, refer to Getting started with Vaadin Spring without Spring Boot.
Creating a Spring Boot project
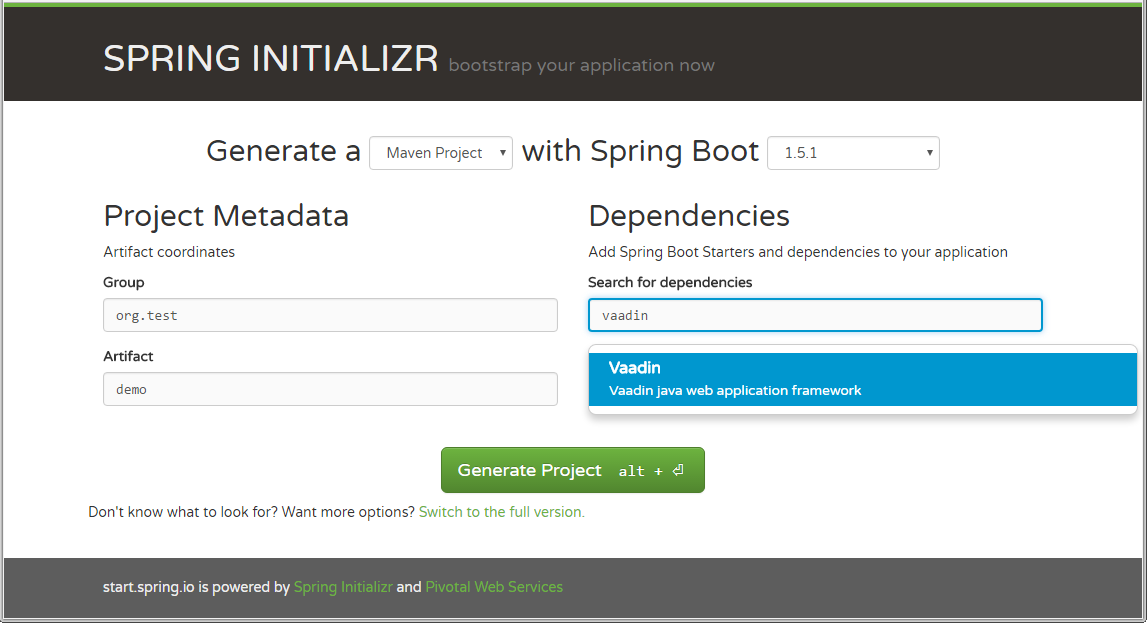
The easiest way to get started is to go to https://start.spring.io/ and fill in the necessary details.
Make sure you at least select Vaadin. The rest of the tutorial uses lambdas, so Java 8 is recommended but not required. Then download the generated project as a Maven Project and open it up in your favorite IDE.
Import the generated project into your IDE - if using Eclipse, use Import…→Existing Maven Projects.
Creating your Vaadin UI
Create a new UI class in your project and annotate it with @SpringUI e.g. like this:
@SpringUI
public class MyUI extends UI {
    @Override
    protected void init(VaadinRequest vaadinRequest) {
        setContent(new Label("Hello! I'm the root UI!"));
    }
}
Run the main(String[]) method in the generated Application class and point your browser to http://localhost:8080 . Voila!
Injection and Scopes with Vaadin Spring
Note also that even though this tutorial covers some of the basics of Spring, this is not a tutorial for Spring. If you are not familiar with Spring and Spring Boot, you should consult their tutorials and documentation.
Injecting beans
Now that the UI itself has been injected, we can use the @Autowired annotation to further inject beans to it. Let’s create something for us to actually inject.
We’ll define the following class to inject to our UI:
package org.vaadin.spring.tutorial;

import com.vaadin.spring.annotation.SpringComponent;
import com.vaadin.spring.annotation.UIScope;

@SpringComponent
@UIScope
public class Greeter {
    public String sayHello() {
        return "Hello from bean " + toString();
    }
}
Note the annotations @SpringComponent and @UIScope, which will be explained below.
So far so good, now we’ll inject it into our UI.
@Theme("valo")
@SpringUI
public class MyUI extends UI {
    @Autowired
    private Greeter greeter;

    @Override
    protected void init(VaadinRequest request) {
        setContent(new Label(greeter.sayHello()));
    }
}
Now let’s run the application to see that an instance of the greeter has been injected to the UI.
If you are not familiar with Spring, note that you can only auto-wire into Spring managed beans. In practice, this
typically means that you can inject beans into a bean that has been injected, but not to one that has been created
with new MyBean(). Refer to Spring documentation for a more complete coverage on this.
If you are a habitual user of Spring, you may have been wondering about the use of @SpringComponent instead of
@Component. Spring has an annotation @Component for classes that are candidates for auto-detection during
classpath scanning, and Vaadin has an interface called Component for UI components. You cannot import the two in
the same file, so to avoid the necessity to fully qualify one of these, Vaadin Spring provides an alias
@SpringComponent for org.springframework.stereotype.Component. However, where there is no ambiguity
(such as in the simple Greeter above), org.springframework.stereotype.Component can also be used directly.
The @UIScope annotation is specific to Vaadin Spring. Anything injected with that annotation will get the same
instance while within the same UI. Load a different UI and you’ll get a different instance. If the session expires
or the UI is closed, the instances will be cleaned up.
Vaadin Spring also defines a view scope (@ViewScope), which will be covered in a later tutorial as well as a
Vaadin session scope (@VaadinSessionScope), which also works with server push and background operations using
UI.access(). Furthermore, the standard Spring scopes can be used with some restrictions. Most commonly, you would
use @Scope("prototype") to inject a new instance every time that bean is injected. For thread safe background
services, the scope @Scope("singleton") can be used, but it should not be used for Vaadin Components. The request and
session scopes of Spring do not match exactly the Vaadin session and do not work in background threads such as in
operations even when using UI.access().
@SpringUI
The @SpringUI annotation is the way in which you let the Vaadin Spring plugin know which UI’s should be accessible to
the user and how they should be mapped. It accepts one optional String parameter indicating the UI path. If an explicit
path is not provided or an empty string is used as the path, the UI will be mapped to the context root.
Views and Navigation with Vaadin Spring
Spring Views
To support navigation between views, the annotations @SpringView and @SpringViewDisplay can be used.
The views themselves should be annotated with @SpringView to be found by SpringViewProvider.
Let’s start with a default view:
@SpringView(name = DefaultView.VIEW_NAME)
public class DefaultView extends VerticalLayout implements View {
    public static final String VIEW_NAME = "";

    @PostConstruct
    void init() {
        addComponent(new Label("This is the default view"));
    }

    @Override
    public void enter(ViewChangeEvent event) {
        // This view is constructed in the init() method()
    }
}
This view is registered automatically based on the @SpringView annotation. As it has an empty string as its view name,
it will be shown when navigating to http://localhost:8080/ .
To see how navigation between views works, we can create another view mapped to a different view name. Note the use of a constant for the view name, which is a good practice and allows you to easily refer to the views.
@SpringView(name = ViewScopedView.VIEW_NAME)
public class ViewScopedView extends VerticalLayout implements View {
    public static final String VIEW_NAME = "view";

    @PostConstruct
    void init() {
        addComponent(new Label("This is a view scoped view"));
    }

    @Override
    public void enter(ViewChangeEvent event) {
        // This view is constructed in the init() method()
    }
}
To define where in the UI the views are to be shown, a bean or a class implementing ViewDisplay or extending
(Single)ComponentContainer should be annotated with @SpringViewDisplay. In the simplest cases, this can be the UI class
itself.
Also this view is automatically registered as it has the @SpringView annotation, so after annotating the UI with
@SpringViewDisplay we would be able to open it by opening http://localhost:8080#!view . However, we’ll want to make it
easy to enter the view, so let’s add a navigation button for it in the UI:
@Theme("valo")
@SpringUI
@SpringViewDisplay
public class MyUI extends UI implements ViewDisplay {

    private Panel springViewDisplay;

    @Override
    protected void init(VaadinRequest request) {
        final VerticalLayout root = new VerticalLayout();
        root.setSizeFull();
        setContent(root);

        final CssLayout navigationBar = new CssLayout();
        navigationBar.addStyleName(ValoTheme.LAYOUT_COMPONENT_GROUP);
        navigationBar.addComponent(createNavigationButton("View Scoped View",
                ViewScopedView.VIEW_NAME));
        root.addComponent(navigationBar);

        springViewDisplay = new Panel();
        springViewDisplay.setSizeFull();
        root.addComponent(springViewDisplay);
        root.setExpandRatio(springViewDisplay, 1.0f);

    }

    private Button createNavigationButton(String caption, final String viewName) {
        Button button = new Button(caption);
        button.addStyleName(ValoTheme.BUTTON_SMALL);
        // If you didn't choose Java 8 when creating the project, convert this
        // to an anonymous listener class
        button.addClickListener(event -> getUI().getNavigator().navigateTo(viewName));
        return button;
    }

    @Override
    public void showView(View view) {
        springViewDisplay.setContent((Component) view);
    }
}
Now fire up the application class and go to http://localhost:8080/ to see this in action.
Views and Scopes
Let’s add one more view, this time a UI scoped view, and inject a Greeter into it:
// Pay attention to the order of annotations
@UIScope
@SpringView(name = UIScopedView.VIEW_NAME)
public class UIScopedView extends VerticalLayout implements View {
    public static final String VIEW_NAME = "ui";

    @Autowired
    private Greeter greeter;

    @PostConstruct
    void init() {
        addComponent(new Label("This is a UI scoped view. Greeter says: " + greeter.sayHello()));
    }

    @Override
    public void enter(ViewChangeEvent event) {
        // This view is constructed in the init() method()
    }
}
After this, what remains is to add a navigation button for it in the UI:
        ...
        navigationBar.addComponent(createNavigationButton("UI Scoped View",
                UIScopedView.VIEW_NAME));
        navigationBar.addComponent(createNavigationButton("View Scoped View",
                ViewScopedView.VIEW_NAME));
        ...
That’s it.
Note that now when navigating between the views, you always get the same instance of the UI scoped view (within the same UI) but a new instance of the view scoped view every time when navigating to it. To verify that this is the case, we can inject some more beans to our views:
@SpringComponent
@ViewScope
public class ViewGreeter {
    public String sayHello() {
        return "Hello from a view scoped bean " + toString();
    }
}
Note the annotation @ViewScope, which makes the lifecycle and injection of instances of this bean view specific.
@SpringView(name = ViewScopedView.VIEW_NAME)
public class ViewScopedView extends VerticalLayout implements View {
    public static final String VIEW_NAME = "view";

    // A new instance will be created for every view instance created
    @Autowired
    private ViewGreeter viewGreeter;

    // The same instance will be used by all views of the UI
    @Autowired
    private Greeter uiGreeter;

    @PostConstruct
    void init() {
        addComponent(new Label("This is a view scoped view"));
        addComponent(new Label(uiGreeter.sayHello()));
        addComponent(new Label(viewGreeter.sayHello()));
    }

    @Override
    public void enter(ViewChangeEvent event) {
        // This view is constructed in the init() method()
    }
}
Now when switching views, the UI scoped greeter instance and the UI scoped view will stay the same, whereas the view scoped greeter (and the view itself) will be regenerated every time when entering the view.
Access Control and Error Views
When looking for accessible views, SpringViewProvider first looks for views that can be used with the current UI.
It is possible to restrict a view to specific UI classes using an annotation parameter like @SpringView(VIEW_NAME, ui={ MyUIClass.class }).
After selecting such candidate views, access to that view is checked in two phases with all the view access delegates
that have been registered. Thus, any Spring bean implementing ViewAccessControl is first asked if access is granted to
a view with the given bean name. If no access delegate blocks access to the view based on the bean name, a second check
is made with a specific view instance by calling all beans implementing ViewInstanceAccessControl. If access to the
view is denied by any access control bean, the view provider will default act as if the view didn’t exist. However, an
"access denied" view can be registered with SpringViewProvider.setAccessDeniedViewClass() if a specific "access denied" view is desired.
You can also define a generic error view when the user tries to navigate to a view that does not exist. This is
configured simply by calling getNavigator().setErrorView(MyErrorView.class) in your UI init() method.
Note that Spring Security is not covered by this tutorial. The unofficial add-on vaadin4spring that builds on top of the official add-on and provides easy integration of Spring Security as well as a "sidebar" module that makes constructing a UI for navigation in a Vaadin Spring application easier.
Getting started with Vaadin Spring without Spring Boot
Note that this step is for using Vaadin Spring without Spring Boot. Using Spring Boot is the recommended approach for getting started quickly when creating a new project.
For more information on using Vaadin Spring with Spring Boot, see the step Getting Started with Vaadin Spring and Spring Boot.
Creating a Vaadin project
If you’ve created Vaadin projects before, there’s nothing new here. Vaadin projects can be created with Vaadin Eclipse Plug-in (for more information, see https://vaadin.com/eclipse) File→New→Project… then select Vaadin Maven Project. This will take you to the project creation wizard.
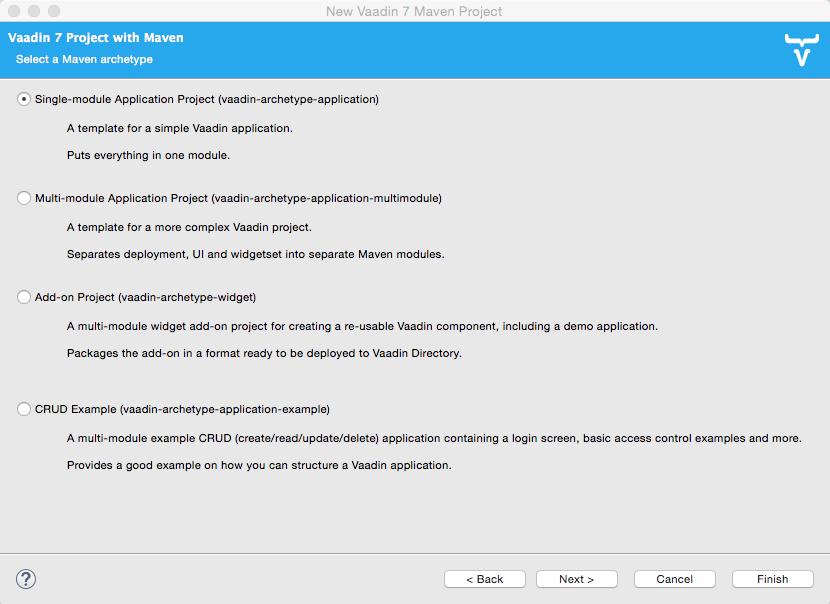
Then select the "Single Module Application Project". Set your group and artifact id and your package to your liking. (I used "org.vaadin", "spring.tutorial" and "org.vaadin.spring.tutorial" respectively).
You can also create the project without the plug-in, just create a project from maven archetype
com.vaadin:vaadin-archetype-application:7.7.3 using Eclipse Maven wizard, or with your IDE,
or with on the command line.
For more information, see https://vaadin.com/maven.
Adding Vaadin Spring as a dependency
Open "pom.xml" and add
<dependency>
    <groupId>com.vaadin</groupId>
    <artifactId>vaadin-spring</artifactId>
    <version>2.0.0</version>
</dependency>
in the dependencies. If your project does not use the Vaadin add-on Maven repository yet, add it to the POM:
<repositories>
    <repository>
        <id>vaadin-addons</id>
        <url>https://maven.vaadin.com/vaadin-addons</url>
    </repository>
</repositories>
Then save and update the project.
Creating the UI
The project wizard created a UI for us that we’ll use as a starting point for building our application. There are some unnecessary things we’ll take out and some things we’ll need to add. We’ll also have to make a few changes to the UI to make it work with Vaadin Spring.
Here’s the UI’s original source:
@Theme("mytheme")
public class MyUI extends UI {

    @Override
    protected void init(VaadinRequest vaadinRequest) {
        final VerticalLayout layout = new VerticalLayout();

        final TextField name = new TextField();
        name.setCaption("Type your name here:");

        Button button = new Button("Click Me");
        button.addClickListener( e -> {
            layout.addComponent(new Label("Thanks " + name.getValue()
                    + ", it works!"));
        });

        layout.addComponents(name, button);

        setContent(layout);
    }

    @WebServlet(urlPatterns = "/*", name = "MyUIServlet", asyncSupported = true)
    @VaadinServletConfiguration(ui = MyUI.class, productionMode = false)
    public static class MyUIServlet extends VaadinServlet {
    }
}
To allow Vaadin Spring to use the UI you’ll need to add the following annotation to the UI: @SpringUI
A configuration class needs to be added to set up a Spring application context, and the servlet should inherit
from SpringVaadinServlet. In this tutorial, a ContextLoaderListener is used to initialize Spring itself.
The resulting UI should be something like this:
package org.vaadin.spring.tutorial;

import javax.servlet.annotation.WebListener;
import javax.servlet.annotation.WebServlet;

import org.springframework.context.annotation.Configuration;
import org.springframework.web.context.ContextLoaderListener;

import com.vaadin.annotations.Theme;
import com.vaadin.server.VaadinRequest;
import com.vaadin.spring.annotation.EnableVaadin;
import com.vaadin.spring.annotation.SpringUI;
import com.vaadin.spring.server.SpringVaadinServlet;
import com.vaadin.ui.Button;
import com.vaadin.ui.Button.ClickEvent;
import com.vaadin.ui.Label;
import com.vaadin.ui.UI;
import com.vaadin.ui.VerticalLayout;

@Theme("mytheme")
@SpringUI
public class MyUI extends UI {

    @WebListener
    public static class MyContextLoaderListener extends ContextLoaderListener {
    }

    @Configuration
    @EnableVaadin
    public static class MyConfiguration {
    }

    @Override
    protected void init(VaadinRequest vaadinRequest) {
        final VerticalLayout layout = new VerticalLayout();

        final TextField name = new TextField();
        name.setCaption("Type your name here:");

        Button button = new Button("Click Me");
        button.addClickListener( e -> {
            layout.addComponent(new Label("Thanks " + name.getValue()
                    + ", it works!"));
        });

        layout.addComponents(name, button);

        setContent(layout);
    }

    @WebServlet(urlPatterns = "/*", name = "MyUIServlet", asyncSupported = true)
    public static class MyUIServlet extends SpringVaadinServlet {
    }
}
With the @SpringUI annotation the Vaadin Spring plugin will know to inject the UI rather than directly
instantiating it. With injected beans we can use all of the usual Spring features such as autowiring. More on that in later tutorials.
In addition to these changes, when not using Spring Boot, create the following Spring context file at src/main/webapp/WEB-INF/applicationContext.xml :
<?xml version="1.0" encoding="UTF-8"?>
<beans xmlns="http://www.springframework.org/schema/beans"
    xmlns:xsi="http://www.w3.org/2001/XMLSchema-instance" xmlns:context="http://www.springframework.org/schema/context"
    xsi:schemaLocation="http://www.springframework.org/schema/beans
                           http://www.springframework.org/schema/beans/spring-beans.xsd
                           http://www.springframework.org/schema/context
                           http://www.springframework.org/schema/context/spring-context-4.1.xsd">

    <bean class="org.vaadin.spring.tutorial.MyUI.MyConfiguration" />
    <context:component-scan base-package="org.vaadin.spring.tutorial" />
</beans>
A full description of alternative approaches to configuring Spring is outside the context of this tutorial and you should consult Spring documentation for them, but a brief introduction to them is given in this tutorial.
Deployment
Once the UI is done we’ll deploy it to our server by Run→Run as→Run on Server. Select your server runtime (Tomcat in our case) and click Finish.
Eclipse should automatically open an embedded browser directed at your development server.
Congratulations! You’ve deployed your Spring application.
Configuring and Using Vaadin Spring without Spring Boot
Using Vaadin Spring without Spring Boot
In the previous tutorial steps, Spring Boot was used to initialize the context, configuration and servlet. This is the easiest way to set up a Spring application, but Spring also offers various other approaches both to configuration and to servlet startup.
When not using Spring Boot, there are two things to do to get an application started: start a servlet and configure an appropriate Spring application context for it. Each of these can be done in many different ways, some of which are not covered here.
If you are familiar with Spring, note that the application context should include the @Configuration class
VaadinConfiguration and a SpringVaadinServlet (or a servlet that registers a Vaadin SpringUIProvider as a Spring
managed bean in a similar way) should be mapped both to the application path and to the path "/VAADIN/" if the application path is not "/".
Here, we first take a look at some of the different approaches to configuring Spring applications
(different ApplicationContexts) and how those can be used with Vaadin Spring, and then cover some approaches to
bootstrapping a Vaadin Spring application and loading the appropriate WebApplicationContext.
Note that this page is not meant to be a complete reference - for more information on each of the approaches, refer to Spring documentation.
Configuration options
Every Spring web application has one or more ApplicationContexts (typically an optional root context and a context
per servlet), which provide read-only configuration for an application and e.g. bean factory methods for accessing
application components. For Vaadin Spring, any of the context variants can be used. However, the selected context should
normally register the configuration class VaadinConfiguration to configure some beans that Vaadin Spring depends on.
It is possible to mix different application contexts and e.g. import an @Configuration class from XML by registering
is as a bean or to import XML configuration from an @Configuration class with @ImportResource.
Refer to Spring documentation for more details on this.
Annotation based configuration
The recommended configuration option with Vaadin Spring is to use annotation based configuration
(AnnotationConfigWebApplicationContext) and configuration classes annotated with @Configuration,
where beans can be explicitly declared with @Bean on a method. When using this approach, simply add the annotation
@EnableVaadin for one of your configuration classes to automatically import VaadinConfiguration.
A simple example of a configuration class for a Vaadin Spring application:
@Configuration
@EnableVaadin    // this imports VaadinConfiguration
public class MyConfiguration {
    // application specific configuration - register myBean in the context
    @Bean
    public MyBean myBean() {
        return new MyBean();
    }
}
When using this approach, you can register the configuration class VaadinConfiguration (or a custom configuration
class with @EnableVaadin) in the context to bootstrap Vaadin Spring configuration. See below for an example of doing
this with a WebApplicationInitializer.
XML configuration
If using XML based configuration of Spring (XmlWebApplicationContext), register the configuration class as a bean and
enable annotation based configuration with <context:annotation-config/> or component scanning with
<context:component-scan base-package=”…”/> to configure Vaadin Spring.
<?xml version="1.0" encoding="UTF-8"?>
<beans xmlns="http://www.springframework.org/schema/beans"
    xmlns:xsi="http://www.w3.org/2001/XMLSchema-instance" xmlns:context="http://www.springframework.org/schema/context"
    xsi:schemaLocation="http://www.springframework.org/schema/beans
                           http://www.springframework.org/schema/beans/spring-beans.xsd
                           http://www.springframework.org/schema/context
                           http://www.springframework.org/schema/context/spring-context-4.1.xsd">

    <!-- See the MyConfiguration class in the previous example -->
    <bean class="org.vaadin.spring.tutorial.MyUI.MyConfiguration" />
    <context:component-scan base-package="org.vaadin.spring.tutorial" />
</beans>
Bootstrapping a Vaadin Spring application
There are several options to start a SpringVaadinServlet (or a custom subclass of VaadinServlet that registers a
SpringUIProvider if using e.g. Vaadin TouchKit) so that it has a suitable application context.
Using ContextLoaderListener directly
An easy way to load the application context for a Spring application is to use a ContextLoaderListener as a servlet
context listener to start and stop a Spring root WebApplicationContext. Once registered in your web.xml, with the
Servlet 3.0 annotation @WebListener or programmatically, it will create an application context when needed and make it
available to the servlet.
By default, a context of the type XmlWebApplicationContext is created and the context XML file is loaded from
"WEB-INF/applicationContext.xml" (configurable with the context init parameter contextConfigLocation). The type of the
context can be customized with the servlet context init parameter contextClass in "web.xml" (context-param) or e.g.
in Tomcat "context.xml" configuration file. Unfortunately, the Servlet 3.0 specification does not support setting
servlet context init parameters with annotations.
If you register a ContextLoaderListener with the @WebListener annotation, see the sample "applicationContext.xml"
file above for an example of bootstrapping JavaConfig with this approach.
// this will load WEB-INF/applicationContext.xml
@WebListener
public class MyListener extends ContextLoaderListener {}
Using a WebApplicationInitializer
A Spring WebApplicationInitializer can be used to manually set up a servlet and a context for it. Classes implementing
WebApplicationInitializer are automatically scanned for and used to initialize servlets. Here is a simple example of
such an initializer which uses an AnnotationConfigWebApplicationContext and classpath scanning to find a configuration
class placed in the same package with this class.
public class WebContextInitializer implements WebApplicationInitializer {
    @Override
    public void onStartup(javax.servlet.ServletContext servletContext)
            throws ServletException {
        AnnotationConfigWebApplicationContext context = new AnnotationConfigWebApplicationContext();
        // alternatively, could use context.register(MyConfiguration.class) and
        // optionally @ComponentScan("my.package") on the configuration class
        context.scan(WebContextInitializer.class.getPackage().getName());
        servletContext.addListener(new ContextLoaderListener(context));
        registerServlet(servletContext);
    }

    private void registerServlet(ServletContext servletContext) {
        ServletRegistration.Dynamic dispatcher = servletContext.addServlet(
                "vaadin", SpringVaadinServlet.class);
        dispatcher.setLoadOnStartup(1);
        dispatcher.addMapping("/*");
    }
}
A note on Spring DispatcherServlet and Spring MVC
Spring MVC uses DispatcherServlet, which supports yet another method for bootstrapping by having the servlet
initialize its own application context if none is configured from outside. However, DispatcherServlet makes some
assumptions about the use of a page based MVC type of approach. Therefore, a typical Vaadin Spring application does not
use DispatcherServlet.
It is possible to map both DispatcherServlet and SpringVaadinServlet to different context paths to use both
simultaneously to e.g. support Spring MVC and Vaadin in the same application. If doing so, remember to also map the
path “/VAADIN/*” to the Vaadin servlet for serving static resources. Note that there are some limitations for using the
session scope of Spring with Vaadin (it does not work in WebSocket push requests etc.).
Vaadin Spring tips
Vaadin Spring (Boot) configuration properties
Your project, if generated by https://start.spring.io/, contains a configuration file
"src/main/resources/application.properties" or similar YAML configuration file. It is a handy way to configure the
VaadinServlet that is automatically introduced by Vaadin Spring. Here are couple of example which can be configured:
-
vaadin.servlet.productionMode=true
-
vaadin.servlet.heartbeatInterval=60
-
vaadin.servlet.closeIdleSessions=true
For full list of available properties, see VaadinServletConfigurationProperties.java.
Automatic view name generation
Using explicit view names is strongly recommended, but it is possible to omit the view name, in which case a name is automatically generated based on the class name. If an explicit name is not provided the class name of the UI will be used to construct a pathname by the following convention: any trailing "View" will be truncated and camelcase will be converted to hyphenated lowercase. Some examples of the convention:
HelloWorldView → hello-world
ExampleView → example
VisualEditor → visual-editor
Listing Views
The list of available views can be obtained from SpringViewProvider bean using getViewNamesForCurrentUI().